Bad skin retouching is expensive. It kills texture, flattens depth, and leaves portraits with that plastic, overworked look clients notice immediately-even when they can’t explain why.
After years of retouching beauty and commercial images, I’ve seen the same bottleneck repeatedly: editors rely on fast fixes that save minutes upfront but cost hours in revisions, rejected selects, and weakened portfolio trust.
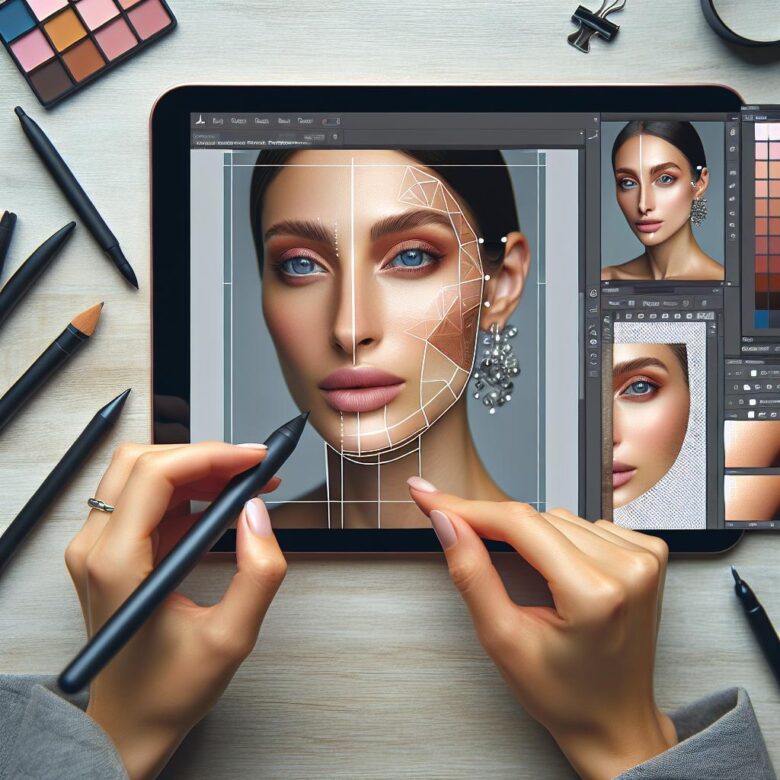
Below, I break down the essential Photoshop techniques that separate polished, high-end skin work from amateur smoothing-from frequency separation and dodge-and-burn control to cleanup decisions that preserve pores, tone, and realism. You’ll get a practical workflow for producing clean, natural skin that holds up in print, campaigns, and close-up scrutiny.
Frequency Separation in Photoshop: How to Preserve Natural Skin Texture While Correcting Tone and Blemishes
Most bad frequency separation work fails for one reason: the blur radius is set too high, wiping out pore structure and creating the plastic skin clients notice instantly at 100% zoom. In Adobe Photoshop, the low-frequency layer should carry only color and luminosity transitions, while the high-frequency layer must retain pores, fine lines, and edge detail.
- Build two duplicate layers: apply Gaussian Blur to the lower copy until blotchy color merges but pores are still barely visible, then generate the upper texture layer with Apply Image so the pair recombines cleanly in Linear Light.
- Correct uneven tone, redness, and under-eye discoloration only on the low layer using Lasso + feather, Mixer Brush, or targeted painting at low flow; keep blemish cleanup, stray hairs, and flaky texture strictly on the high layer with Healing Brush or Clone Stamp.
- Avoid using frequency separation for shaping form or reducing deep wrinkles globally; those corrections belong in dodge and burn, otherwise transitions flatten and skin starts to look synthetic under studio-grade sharpening.
Field Note: On a 45MP beauty campaign file, I fixed a retoucher’s muddy cheek transitions by rebuilding frequency separation with a 3.2 px blur instead of 8 px, which restored natural pores and eliminated the waxy print artifact the client flagged on proof sheets.
Dodge and Burn for High-End Skin Retouching: A Step-by-Step Workflow to Sculpt Light, Smooth Transitions, and Avoid Plastic Skin
Most “plastic skin” retouching is not caused by frequency separation alone; it happens because dodge and burn is pushed globally instead of correcting micro-transitions selectively. High-end skin work lives in the half-tones, where a 1-3% tonal shift can remove blotchiness without erasing pore structure.
- Set up two Curves adjustment layers: one brightening, one darkening, each with inverted masks; paint on masks with a soft brush at 1-4% flow, sampling transitions rather than chasing every pore.
- Work on a neutral reference view using a temporary black-and-white check layer or Retouch4me Dodge&Burn preview to expose uneven luminosity, then correct only short tonal breaks, not stable texture.
- Zoom out often to 50% and 100%; if the retouch reads only at 300%, you are overworking the file. Keep brush size slightly larger than the imperfection so edges feather cleanly into surrounding skin.
Field Note: On a 45 MP beauty campaign close-up, I cut retouch time nearly in half by mapping forehead and cheek transitions first, then handling isolated blemish shadows last, which stopped the common mistake of flattening natural highlight roll-off around the zygomatic arch.
Professional Skin Cleanup Techniques: Using Healing, Cloning, and Micro-Contrast Control for Editorial-Quality Retouching
Most bad beauty retouching fails at the cleanup stage: pores get duplicated, transitions flatten, and micro-contrast collapses long before frequency separation or grading begins. Editorial-quality skin work depends on separating true distractions from permanent anatomy, then correcting each defect with the least destructive tool.
- Healing strategy: Use the Healing Brush on a blank layer set to Current & Below for transient issues only-blemishes, flakes, razor nicks, and short-lived redness. Keep sample areas within the same pore direction and luminosity band to avoid waxy blending.
- Cloning discipline: Switch to Clone Stamp at low flow for edge-critical zones like nostrils, lip contours, lash lines, and specular breakups where healing smears structure. In Adobe Photoshop, aligned sampling plus frequent source resets prevents repeating pore clusters that art directors spot immediately at 100%.
- Micro-contrast control: After cleanup, correct uneven local contrast with dodge and burn or a low-radius curve-based method instead of more healing. This preserves skin texture while reducing patchiness, especially across cheeks, under-eyes, and mandibular transitions.
Field Note: On a 12-megapixel cosmetics close-up for print, I replaced over-healed under-eye cleanup with selective cloning and two minutes of micro dodge-and-burn, and the client approved the file only after the natural creasing and pore tension returned.
Q&A
1. What is the most reliable Photoshop workflow for high-end skin retouching without making skin look plastic?
The most reliable workflow combines cleanup, frequency separation, and dodge & burn in a controlled order. Start by removing temporary distractions such as blemishes, dust, and stray hairs with the Healing Brush or Clone Stamp on a separate layer. Then use frequency separation carefully to correct uneven texture and blotchy color independently, but avoid heavy blurring on the low-frequency layer. Finish with dodge and burn to refine transitions, reduce unwanted shadows, and shape the skin naturally.
The key is to preserve real pore structure, tonal variation, and facial character. Over-retouching usually happens when texture is blurred too aggressively or when every line and pore is treated as a flaw. In high-end beauty work, the goal is polished skin that still looks human at 100% zoom and in print.
2. When should frequency separation be used, and what are the most common mistakes?
Frequency separation is best used when you need to separate color/tone problems from texture problems. For example, it is useful for fixing patchy redness, uneven makeup, or transitions under the eyes while keeping skin texture intact. It is not a complete retouching solution by itself; it works best as one part of a broader workflow.
The most common mistakes are:
- Using too much blur on the low-frequency layer, which creates waxy skin.
- Trying to fix everything with frequency separation instead of using dodge and burn for natural tonal refinement.
- Repeating texture unnaturally on the high-frequency layer, causing obvious cloning patterns.
- Ignoring color contamination near edges like lips, nostrils, and hairlines.
A good rule is to use the lowest blur radius that separates texture from tone and to check the image often at both close and normal viewing sizes.
3. Is dodge and burn more important than automated or plugin-based skin smoothing for professional results?
Yes. For professional, high-end skin retouching, dodge and burn is usually more important than automated smoothing because it corrects the actual cause of rough-looking skin: uneven light and shadow. Many texture issues appear distracting not because the texture is bad, but because tonal transitions are irregular. Subtle dodge and burn allows you to even out those transitions while preserving authentic detail.
Plugins and automated tools can speed up basic work, but they often flatten depth, remove natural variation, and create a generic beauty look. Manual dodge and burn gives far more control over cheek transitions, under-eye areas, forehead highlights, and small inconsistencies around pores and fine lines.
| Technique | Best Use | Main Risk |
|---|---|---|
|
Cleanup Tools |
Removing temporary blemishes and distractions |
Over-removing natural features |
|
Frequency Separation |
Separating texture from color/tone corrections |
Waxy, artificial skin |
|
Dodge & Burn |
Refining tonal transitions naturally |
Patchy or muddy contrast if overdone |
Wrapping Up: Essential Photoshop Techniques for High-End Skin Retouching Insights
High-end skin retouching earns its value in what stays invisible: believable texture, quiet transitions, and restraint strong enough to survive a 200% zoom and still feel human at full size. The biggest mistake I still see is chasing “clean” skin so aggressively that the portrait loses age, character, and credibility.
Pro Tip: If you only lock in one habit, make it this: pause before export, flip the image horizontally, then review pores, tonal patches, and edges at 50%, 100%, and 200%. That single check catches more bad retouching than any plugin ever will.
Before you close this tab, open your last edit, create a fresh blank layer, and remove five corrections you now realize were unnecessary. That discipline is what separates polished work from over-retouched work.

Dr. Julian Mond is a visual storyteller and researcher dedicated to the intersection of light, history, and human emotion. With a doctorate in Visual Arts, he combines academic precision with a cinematic eye to transform fleeting moments into timeless narratives. Through Mond Photos, he explores the world as a living gallery.